How to build VCMI (Windows)
Contents
Prerequisites
- Installed Heroes3 (can be bought for $10 at gog.com) with WoG add-on download.vcmi.eu.
- IDE: Visual C++ 2008 Express Edition. It can be downloaded for free from microsoft.com. Any higher edition will be fine. 2010 version is also supported (project files will be automatically converted but some settings may be a little different).
- SVN Client: TortoiseSVN. Available (for free) at tortoisesvn.net.
- Libraries pack: download.vcmi.eu
- Boost libraries. You can build them on your own using sources from boost.org or download precompiled binaries with installer from boostpro.com.
Preparing place
Initial directory structure and libraries pack
Create a directory for VCMI development, eg. C:\VCMI. Extract there libraries pack. It contains initial directory structure.
VCMI sources
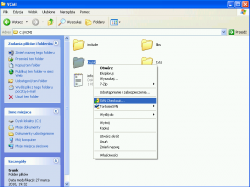
Libraries pack contains default subfolder for VCMI sources named trunk. Right click it and select SVN Checkout from context menu.
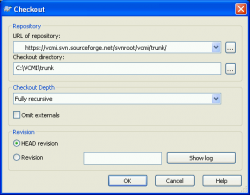
In the dialog type (or paste :]) https://vcmi.svn.sourceforge.net/svnroot/vcmi/trunk/ as URL of repository.
Hit OK and latest VCMI sources will be downloaded from the repository. Double click VCMI_VC9.sln file to open VCMI projects in Visual Studio.
Adjusting project files
Adding Boost library folders
All projects are aware of includes/ and libs/ directories in the main VCMI folder. Because libraries package uses them, the only remaining issue is giving IDE information where you have Boost library (the only library not included in the package).
There are several alternative ways to do that:
Global
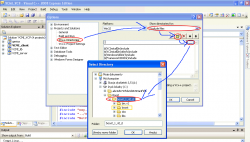
Open Options window via Tools menu. Expand Project and Solutions subtree and select VC++ directiories. Then add appropriate libs and includes directories, selecting appropriately "Include files" or "Library files" from the listbox on the right. It'll allow you to use Boost in all your projects, not only VCMI.
Per project
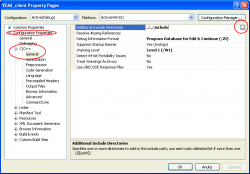
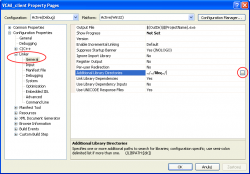
Add Boost individually for each project. Open properties (with context menu of project in solution explorer) window and add includes and libs directories of boost. Look for screenshots below for localizations of that settings in properties window.
Put along with other libs
Simply copy all the boost .lib's to the libs/ subfolder in your main VCMI directory and folder named "boost" containing all incldues to the includes/ subfolder.
Compiling
Now you should be able to succesfully build VCMI. Select "Build solution" from "Build" menu or press F7. Wait until the compilation finishes.
You should finally see "Build: 4 succeeded, 0 failed, 0 up-to-date, 0 skipped" message in the IDE output. Built VCMI binaries will be put in the solution folder (C:\VCMI\trunk in our example). If you want to run VCMI somewhere else, open each project properties and adjust "Output Directory" in "General Properties" tab.
Remember that VCMI_client.exe, VCMI_client.dll and VCMI_server.exe need to be in the same directory and AI (GeniusAI.dll) must be in AI/ subfolder.
Running and debugging VCMI
After compilation you should have received new VCMI binaries in your trunk/ folder:
- VCMI_client.exe
- VCMI_server.exe
- VCMI_lib.dll
- GeniusAI.dll (in trunk/AI/ subfolder)
Running VCMI in a build place (recommended)
VCMI files
Extract package with latest VCMI release to the trunk folder. It contains some content (fonts, graphics, etc) that are not part of SVN repository. Do NOT overwrite anything. Files from repository are always most up-to-date and have priority over the ones released some time ago. If you overwrite any file from SVN you can always use Revert command from TortoiseSVN.
H3 files
VCMI needs files with content from H3. Copy:
- From Data subfolder:
- VIDEO.VID
- Heroes3.snd
- h3sprite.lod
- h3bitmap.lod
VCMI should be smart enough to give meaningful error message when one of content files is missing. Check the console output or VCMI_client_log.txt if something goes wrong.
Running VCMI in external folder
Alternatively, you can simply replace binaries in existing VCMI installation with the ones you've built. In such case you should also replace .txt files in config/ directory with the ones from trunk (and any other relevant files that have changed in SVN).
It's not very convenient because you need to copy files each time after build. To avoid that necessity you can change Output Directory in properties of all projects. Then binaries you built will be automatically put in the right place. However you would still need to remember about changes in config files. (Some script for copying them used as post-built event may be a good idea here)
Running / debugging VCMI from IDE
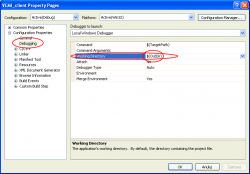
Visual Studio offers several convenient commands to run / debug project. Before you can use them, you need to set Working Directory to $(OutDir) in project properties for VCMI_client.
Now you can start debugging by:
- Using Start Debugging (F5) command - starts game with debugger attached
- Using Step Over/Into (F10 or F11) command - starts game and stops at the beginning of main function, allowing line-by-line execution
- Running VCMI normally and attaching debugger to its process
Further help
If you need any further help, ask at our forums.
